
If the multi-LED method seems like a bit too much work, you can achieve a headlight upgrade with a single 10-watt LED. This offers the benefits of low power consumption and brighter lights.
Here's what a 10-watt LED looks like:

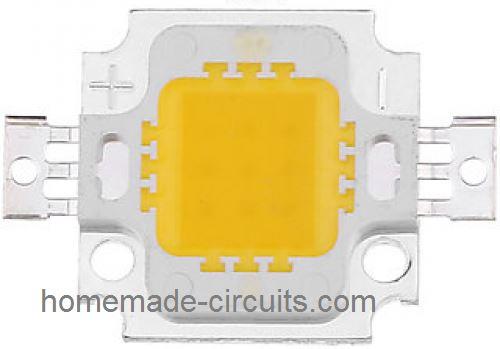
Connecting the 10-Watt LED:
Those two fins on the sides are actually the terminals for connecting the LED to your car's 12V power supply.
Important Safety Note:
Its important to include a current control circuit in the wiring for each LED headlight. This circuit, like the one shown below, is essential for safe, and optimal performance.
It regulates the current flowing through the LED, preventing damage, and ensuring it lights up properly.


Keeping the LED Safe:
Current Control: Resistor R2 plays a crucial role in monitoring the current flowing through the LED.
We wll discuss how to calculate the appropriate value for R2 in a later section.
This resistor is essential for protecting the LED from drawing too much current which could damage it.
Heat Dissipation: The concepts mentioned above (presumably referring to current control circuits) are all important for preventing two main threats to your 10-watt LED headlights: excessive current and overheating (thermal runaway).
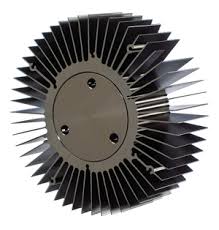
Heat Sink Selection: Equally important is, using a properly sized heat sink for the LED.
As shown below a round finned heat sink is a good option. This heat sink should be mounted behind the headlight housing, to efficiently dissipate the heat generated by the LED.

Thinking Beyond the 10-Watt LED?
The instructions above focused on a 10-watt LED, but you have options! You can use different LEDs with varying specifications as long as you calculate the correct resistor value to keep them safe.
The Formula:
This formula helps you calculate the resistor value:
Resistor = (Supply Voltage) - (Total Forward Voltage of LEDs in Series) / (Desired LED Current)
Let's Break it Down with an Example:
Suppose, you want to use 1-watt LEDs with a forward voltage of 3.3V and a desired current of 350mA. Your car battery supplies 12V. Lets say you plan to connect 3 LEDs in series.
Here's how to find the resistor value (R):
R = 12V - (3.3V x 3) / 0.35A = 6 ohms
Choosing the Right Resistor Wattage:
We also need to consider the resistor's wattage rating to handle the power it dissipates. Heres a formula to find the wattage:
Wattage = (Supply Voltage - Total LED Voltage Drop) x LED Current
In this case:
Wattage = (12V - (3.3V x 3)) x 0.35A ≈ 3.46 watts
Since we want a safe margin, it's best to choose a resistor with a wattage rating of 4 watts or higher.
The Takeaway:
By calculating the resistor value using the formula and choosing the appropriate wattage, you can use various LEDs in your car headlights and customize your setup...
Dimming Your Headlights
One cool advantage of LED headlights is, the ability to adjust their brightness.
This is called Pulse Width Modulation (PWM) control. With PWM you can not only change how bright your headlights are but also save valuable battery power when needed.
The Simple Way to Dim:
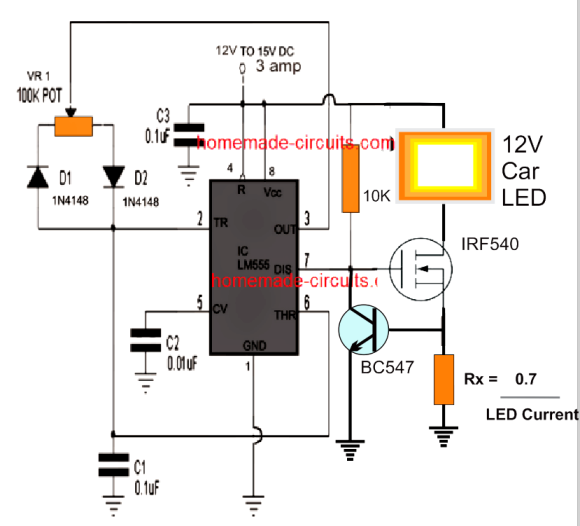
The image below shows a circuit using a common IC chip called the 555 IC.
This circuit can be easily implemented to enable PWM control for your LED headlights.

Protecting Your LEDs
This design prioritizes LED safety with two key features:
- Built-in Current Control: The circuit includes a current controller stage which act like a gate-keeper, ensuring the LED never receives more current than it's designed for. This keeps your LEDs safe and operating optimally under all circumstances.
- Heat Sink for Powerful LEDs: For high-wattage LEDs, a heat sink is crucial. Just like a car radiator cools the engine, a heat sink mounted on the MOSFET (a type of electronic switch) helps dissipate heat generated by the LED. This prevents over-heating and potential damage.
Remember: When using powerful LEDs... always add a dedicated current limiter circuit between the power source and the LED module. This critical step explained earlier in the article, safeguards your LEDs and ensures their longevity.