
This article teaches us how to incorporate a pre-made solar panel system into our house without the need for technical assistance or specialists.
The primary devices needed to put this into practice are an inverter, a solar panel, a solar controller, and a battery.
Overview
It has existed from the beginning of time on Earth and most likely will continue to do so even if all human habitation is eradicated from the globe.
Yes you are correct, we are discussing the sun, which is the only energy source that sustains both our planet and our existence.
Humans have recently begun to realize how much civilization may gain from this fireball—which never shouts "die"—in many subtle and significant ways.
The finest illustrations of how this enormous energy input may be used as a heat source for numerous uses are the contemporary solar cookers and heaters. Historically, people have taken advantage of the sun's heat for centuries.
Nonetheless the creation of solar cells and the process for turning solar energy into electrical power represented the single greatest advancement that humanity could make.
The current world would not function with no electrical power, since we all know how hard it might be to survive without it in our houses.
The unsettling issue plaguing our scholars is the depletion of fossil fuels, which may be the primary energy source utilized in many nations to provide utility power.
However, scientists now are able to successfully collect solar energy at whim and transform it into useable home electrical power because to the creation of solar cells and the enormous advancements achieved in this field of technology.
Furthermore, it's not too difficult to comprehend or set the processes required to connect a solar panel system to a household grid.
Additionally an increasing number of people are choosing solar power for their row homes, farm houses, bungalows, etc. as the installation really pays off in the long term.
It's important that you read this post if you plan to unplug your home from the tedious electric company.
If you were familiar with the fundamentals of electricity, you wouldn't think twice about plugging in the specified settings to start using solar power to power your home right now.
You will have a comprehensive understanding of how to connect a grid tie solar panel system after reading the instructions that follow.
Essential Equipment for Assembling an Off-Grid Solar System
To rig up the grid tie inverter system, you would need the following supplies:
A solar panel's capacity to produce 24 volts in direct sunshine may be determined by the size needed to meet the load requirements.
An inverter that operates on a sine wave would be ideal, but a customized one would also work. One possible voltage is 12 volts. The greatest load that is expected to be employed will determine the current.
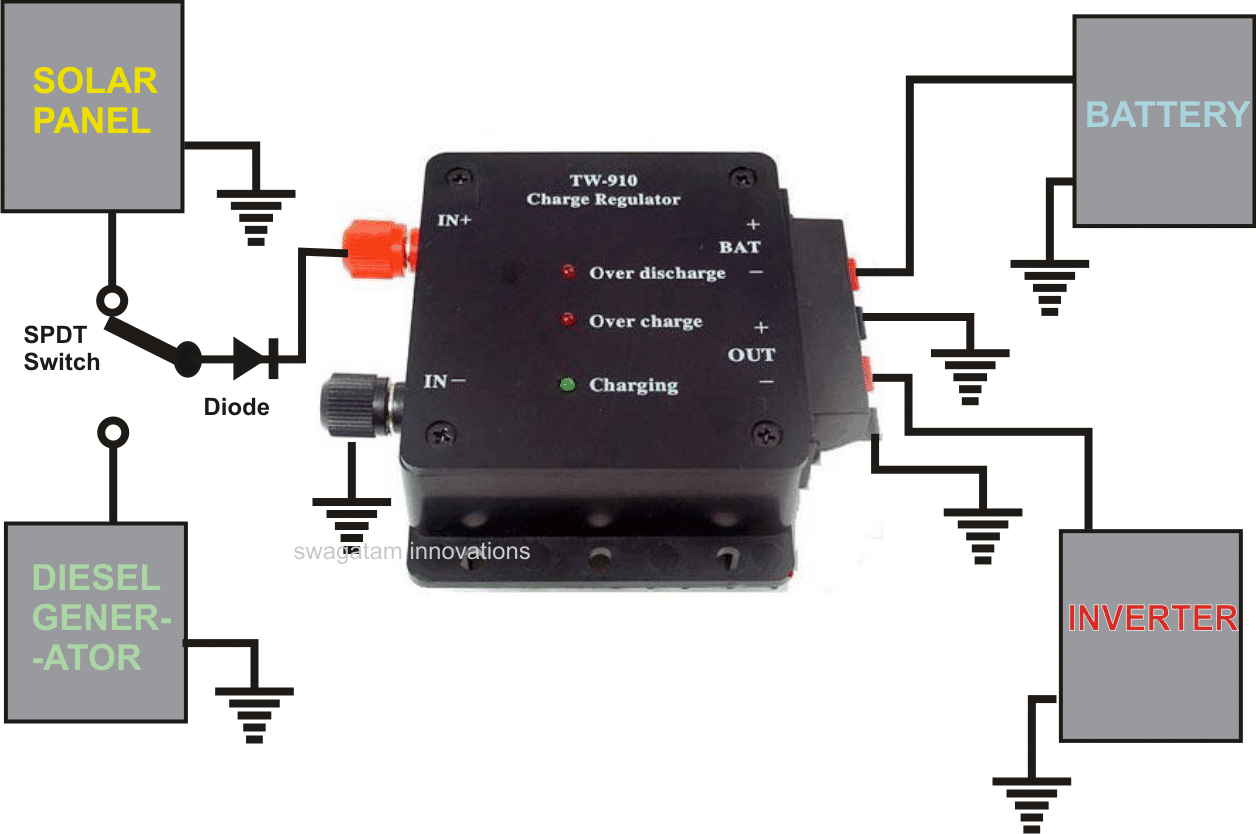
Regulator module and solar panel charger: used to reduce solar panel power and charge batteries.
Car lead acid 12 volt batteries; the Ah will vary depending on the connected load.
Additional compact diesel generator set
A few examples of sundry items are cables, multitesters, insulating tape, toggles, outlets, soldering irons, and screwdrivers.
How to Connect a Solar Panel with Diesel Generator, Battery and Inverter

The following procedures can be used to begin mending the units when you've obtained all of the aforementioned parts:
Place the panels over your home's roof so that they face directly up into the sky. With this orientation, the panel is guaranteed to be exposed to sunlight for the majority of the day between dawn and nightfall.
Once the sun is directly overhead the panel, the above location should deliver a maximum of 24 volts, while at sunset, about 12 volts.
Once there is adequate sunlight above the panels, you may use a multitester (DC volt range) to measure the output voltage from the panel.
The battery charger/regulator device must then be tested. This may be accomplished by momentarily hooking its inputs to the solar output voltage, which is often between 15 and 20 volts.
To verify that the device is operating correctly, examine the regulator's output, which should read about 14 volts.
As it may have been tested before being purchased from the dealer, the inverter often doesn't require testing.
Integration of the inverter and regulator is now necessary, and it is also rather easy. Simply attach the regulator/charger's output connections to the inverter's battery input.
Inverter should also be plugged into your home's main electrical input line. For this stage of the project, you may wish to hire an experienced technician.
Ensure that the inverter installation and charger are securely positioned in an isolated area of the home, separate from heat sources, water, and people.
It is now possible to introduce the battery, which serves as the primary power storage unit, and connect it to the appropriate terminals on the regulator (designated as (+)(-) bat).
At last, we connected the solar panel to the units that were positioned above.
Attach the necessary length of wires to the solar panel connections, then carefully carry them inside the home to the charger's applicable connections (marked +IN and –IN).
If you follow the following setup instructions exactly while the sun is shining brightly, your battery will begin to charge.
According to the circumstances, the regulator will turn the charge on and off while keeping an eye on it.
If the battery was originally fully charged, it would take six hours for the panels to fully charge. Following that, the inverter could be switched on to provide the necessary amount of AC power; ideally, this process would take place when the home is mostly dark.
An additional regulator element and a changeover button can be used to supply the inverter from a diesel-powered automobile generator. By doing this move, your home will always have AC electricity.