
This guide will show you how to build your own remote control system for your home!
We'll use a regular FM radio (with a slight modification) to receive the signal and a simple transmitter you can build yourself.
This lets you turn on and off appliances like lamps and fans from anywhere in the house - no more reaching for the switch!
Making your own remote control might seem complicated, with fancy parts and tricky circuits.
But fear not! This project offers a simpler solution. We'll modify an old FM radio to receive the signal, and build a basic transmitter with just a few components.
Put them together, and you'll have a remote control for your lights, fans, and other small appliances – all from the comfort of your couch!
FM Transmitter for the Remote Control Unit:

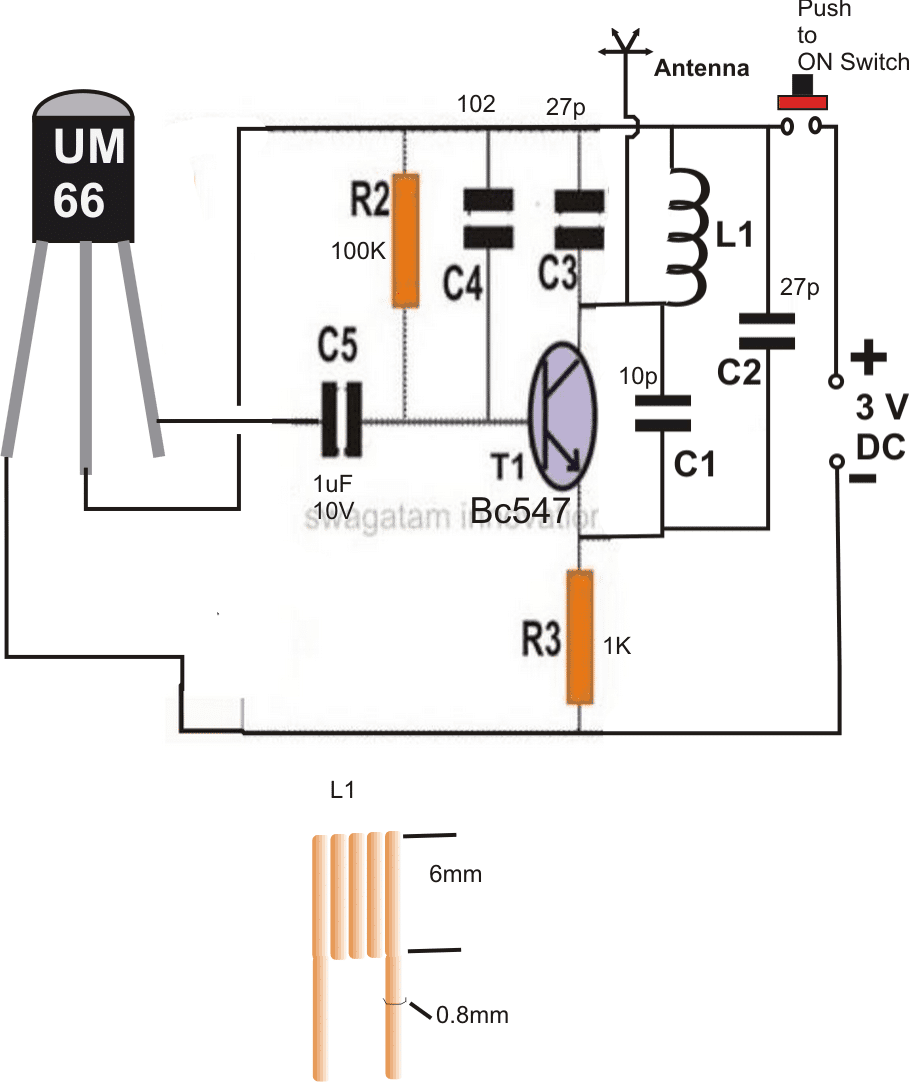
Parts List
- Resistors are 1/4 watt 5% CFR
- 100 k = 1
- 1 k = 1
- Capacitors
- Electrolytic 1 uF / 25 V = 1
- Ceramic 102 = 1
- Ceramic 27 pF = 1
- Ceramic 10 pF =1
- Ceramic 27 pF = 1
- IC UM66 = 1
- Inductor as shown in the diagram = 1
- 3 V Coin Cell = 1
- Microswitch = 1
The picture shows a basic FM transmitter circuit. It uses only one transistor and a few other components. The key part is the coil (inductor) - you'll need to follow the instructions carefully to make it work properly. This transistor, along with tiny capacitors and the coil, creates the radio waves that carry the signal.
How to Use a Music Modulation for Enhancing Transmitter range
Next comes a part with a chip called a UM66 and a special capacitor. This section adds the control signal to the radio waves, making them stronger and reach further.
Once you build the transmitter, turn it on and tune your FM radio to a clear station.
If everything works right, you should hear the UM66 chip's music playing clearly on the radio, even from over 30 meters away!
After the transmitter, you'll build a Flip Flop circuit by following a diagram. This part will eventually connect to your modified FM radio and make the remote control work.


DIY Remote Control: Modding an FM Radio
For this you will need an ordinary FM radio.
Let's modify the radio: Open it up!
Carefully remove the back cover to see the radio's internal setup.
By referring to the above diagram, you will add a special circuit (called a flip-flop) to the radio's speaker terminals.
Turn on the radio and find an empty station with just static.
Adjust the volume until a light turns on, then back it off slightly until the light goes out.
Switch to a station. If everythings working right, the light should flicker with the music, and a relay will switch based on the signal.
That's it.
You've successfully modified your FM radio to receive the remote control signal. Now you can move on to building the transmitter and controlling your gadgets!
How to Test the Remote Control Switching
Turn on your transmitter and tune your radio back to the spot where the transmitter music comes in loud and clear.
That's it! Your homemade remote control is set up. Every time you click the transmitter switch, the radio will receive the signal and activate the flip-flop circuit, which in turn controls the relay.
Wire the relay contacts to any appliance you want to control (lamp, fan, etc.). Now you can turn it on/off with just a click of the transmitter switch!
The radio speaker might make noise when receiving the signal. To avoid this, you have two options:
Advanced: You can carefully desolder the speaker from the circuit board (requires soldering skills).
Simpler: Cover the speaker cone with tape or a piece of fabric to muffle the sound.